A Simple Car Animation
What actually happens
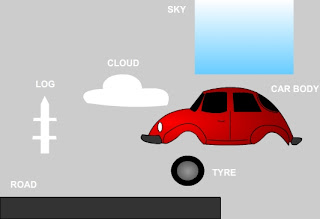
We need 6 graphics for this animation

Draw them as shown in the above image (You don’t need to write the name, only graphics)
Now you have 6 graphics on the stage
1. SKY
2. CLOUD
3. LOG
4. CAR BODY
5. TYRE
6. ROAD
Click on Selection Tool (V)
and draw a rectangle around the cloud to select it.
Press F8
You should immediately see a popup dialogue box
Name - cloud
Type – Movie Clip
Registration – Center
Then press OK
See the drawing has been converted to a Movie clip symbol
Do the same steps for
· SKY
· LOG
· CAR BODY
· TYRE
· ROAD
Select the tyre Movie clip with Selection Tool (V)
Press the Alt key and drag the tyre to right side
Release the mouse and Alt key
Now you have two tyres !!!!
Now we are ready for the animation
Arrange car and tyres and select them all (Car and two tyres). (For multiple section use Shift key)
Press F8
Name it car
Now we need a fence like this
Select the log
Press Ctrl+C – (copy)
then Ctrl +Shift+ V (Paste in Place) 22 times
Now you have 22+1 = 23 logs on the stage but still you see just one log because all of them are in the same place.
Select topmost log, drag and place it in the right side of your stage
Press Ctrl+K (window > align)
You don’t need to click on “To stage” this time, if it is already active click on it to deactivate.
Draw a rectangle around all logs with Selection Tool to select them all
In align panel click on distribute horizontal center
See the magic
Select all logs, press F8 and name it fence
Arrange all movie clips
(WORK IN PROGRESS)
Comments